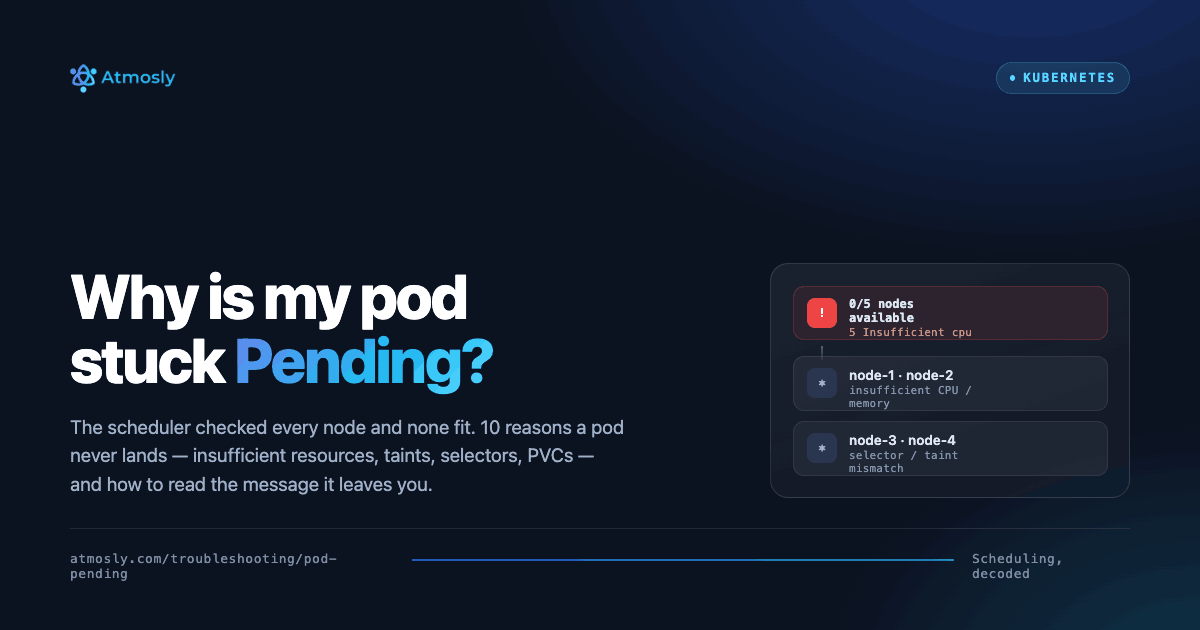
Introduction to Kubernetes Namespaces
Kubernetes namespaces provide logical isolation boundaries within a cluster, enabling multiple teams, applications, or environments to coexist on shared infrastructure while maintaining separation of resources, RBAC permissions, resource quotas, and network policies. Think of namespaces as virtual clusters within a physical cluster. Pods in different namespaces can have the same names without conflict, resources are isolated by default, requiring explicit configuration for cross-namespace communication, and administrative permissions can be scoped to specific namespaces rather than granting cluster-wide access to every team.
Effective namespace management is critical for production Kubernetes because poor namespace design leads to operational problems including naming conflicts where teams unknowingly overwrite each other's resources, RBAC complexity where permissions become impossible to audit, resource contention where one team monopolizes cluster capacity affecting others, cost allocation difficulties making it impossible to determine which team consumes which resources, and security risks from overly permissive cross-namespace access. Organizations running hundreds of services across dozens of teams in shared Kubernetes clusters must implement disciplined namespace strategies from day one or face painful refactoring later when ad-hoc namespace sprawl creates unmanageable complexity.
This comprehensive guide teaches production-tested namespace management best practices covering: what namespaces are and when to use them versus when separate clusters are more appropriate, namespace naming conventions and organizational patterns for different scenarios, implementing namespace-scoped RBAC for team isolation, resource quotas and limit ranges preventing resource monopolization, network policies for namespace isolation, namespace lifecycle management including creation automation and cleanup, label and annotation strategies for namespace organization, cost allocation and chargeback using namespace boundaries, and how Atmosly uses namespaces for project-based multi-tenancy where each Atmosly project maps to Kubernetes namespaces with automatic RBAC configuration, resource quota enforcement, cost tracking per namespace showing team spend, and namespace management through the platform enabling teams to manage their namespaces without cluster-admin access.
What Are Kubernetes Namespaces?
Namespace Fundamentals
Namespaces are Kubernetes resources providing scope for names. Resources in different namespaces can have identical names without conflict.
Default Namespaces in Every Cluster:
- default: Where resources go if no namespace specified. Avoid using for applications (poor practice to dump everything in default)
- kube-system: Kubernetes system components (API server, scheduler, controller-manager, CoreDNS, kube-proxy). Don't deploy applications here
- kube-public: Publicly readable resources (rarely used). ConfigMaps readable by all users including unauthenticated
- kube-node-lease: Node heartbeat objects. Don't touch (system use only)
Namespaced vs Cluster-Scoped Resources:
Most resources are namespaced:
- Pods, Deployments, StatefulSets, DaemonSets
- Services, Ingresses, NetworkPolicies
- ConfigMaps, Secrets
- PersistentVolumeClaims (PVCs)
- Roles, RoleBindings
Some resources are cluster-scoped (no namespace):
- Nodes, PersistentVolumes
- Namespaces themselves
- ClusterRoles, ClusterRoleBindings
- StorageClasses
Namespace Design Patterns
Pattern 1: Namespace Per Environment
Separate development, staging, production:
kubectl create namespace development
kubectl create namespace staging
kubectl create namespace production

# Same application deployed to all three
# Different configurations per environment (replicas, resources, secrets)
Pros:
- ??? Clear environment separation
- ??? Easy RBAC (developers access dev/staging, restricted production)
- ??? Simple to understand
Cons:
- ??? All teams share same namespaces (no team isolation)
- ??? Naming conflicts if multiple teams use same service names
Best for: Single team, small organizations, simple applications
Pattern 2: Namespace Per Team
kubectl create namespace team-frontend
kubectl create namespace team-backend
kubectl create namespace team-data
kubectl create namespace team-ml

# Each team manages their services in own namespace
# All environments (dev, staging, prod) in same namespace
Pros:
- ??? Team isolation (Team A cannot affect Team B)
- ??? Clear ownership
- ??? Easy RBAC per team
Cons:
- ??? Mixing environments in same namespace (dev and prod pods together)
- ??? Harder to enforce different security policies per environment
Best for: Multiple teams, moderate size organizations
Pattern 3: Namespace Per Team Per Environment (Recommended)
# Team A
kubectl create namespace team-a-dev
kubectl create namespace team-a-staging
kubectl create namespace team-a-production

# Team B
kubectl create namespace team-b-dev
kubectl create namespace team-b-staging
kubectl create namespace team-b-production

# Full isolation: Teams separated, environments separated
Pros:
- ??? Maximum isolation and organization
- ??? Different policies per environment (restricted PSS for prod, baseline for dev)
- ??? Clear ownership and boundaries
- ??? Easy cost allocation (per team per environment)
Cons:
- ??? More namespaces to manage
- ??? Potential namespace proliferation
Best for: Large organizations, multi-team environments, clear separation needed (recommended for most production environments)
Namespace Naming Conventions
Consistent Naming Strategy
Format: {team}-{application}-{environment}
Examples:
- frontend-web-production
- backend-api-staging
- data-pipeline-dev
- ml-training-experiment-pr-456
Rules:
- Lowercase only (Kubernetes requirement)
- Hyphens for separation (not underscores or periods)
- Max 63 characters (DNS label limit)
- Start and end with alphanumeric (not hyphen)
Label Namespaces for Organization
apiVersion: v1
kind: Namespace
metadata:
  name: team-a-production
  labels:
    team: team-a
    environment: production
    cost-center: engineering
    owner: alice@company.com
  annotations:
    budget: "5000"
    description: "Team A production workloads"
Labels enable querying and automation:
# List all production namespaces
kubectl get namespaces -l environment=production

# List Team A namespaces
kubectl get namespaces -l team=team-a
Resource Quotas Per Namespace
Preventing Resource Monopolization
apiVersion: v1
kind: ResourceQuota
metadata:
  name: team-a-prod-quota
  namespace: team-a-production
spec:
  hard:
    # Compute quotas
    requests.cpu: "100"          # Max 100 CPU cores requested
    requests.memory: "200Gi"     # Max 200Gi memory requested
    limits.cpu: "200"            # Max 200 CPU cores limit
    limits.memory: "400Gi"       # Max 400Gi memory limit

    # Object count quotas
    count/pods: "500"            # Max 500 pods
    count/deployments.apps: "100"
    count/services: "50"
    count/configmaps: "100"
    count/secrets: "100"

    # Storage quotas
    persistentvolumeclaims: "50"  # Max 50 PVCs
    requests.storage: "2Ti"       # Max 2TB storage requested

    # LoadBalancer quotas (expensive)
    services.loadbalancers: "10"  # Max 10 LoadBalancer Services
What happens when quota exceeded:
- Admission denied when creating resource exceeding quota
- Error: "exceeded quota: team-a-prod-quota, requested: requests.cpu=2, used: requests.cpu=99, limited: requests.cpu=100"
- Team must either delete unused resources or request quota increase
Network Isolation Between Namespaces
Default Deny Cross-Namespace Traffic
# Applied to each namespace
apiVersion: networking.k8s.io/v1
kind: NetworkPolicy
metadata:
  name: deny-other-namespaces
  namespace: team-a-production
spec:
  podSelector: {}  # All pods
  policyTypes:
  - Ingress
  - Egress

  # Allow within same namespace only
  ingress:
  - from:
    - podSelector: {}

  egress:
  - to:
    - podSelector: {}

  # Allow DNS (kube-system)
  - to:
    - namespaceSelector:
        matchLabels:
          name: kube-system
    ports:
    - protocol: UDP
      port: 53
Namespace Lifecycle Management
Automated Namespace Creation
# Template for team namespaces
cat > create-team-namespace.sh << 'EOF'
#!/bin/bash
TEAM=$1

# Create development namespace
kubectl create namespace ${TEAM}-dev
kubectl label namespace ${TEAM}-dev team=${TEAM} environment=dev
kubectl apply -f - <
Namespace Cleanup and Archiving
Identify and clean up unused namespaces:
# Find namespaces with zero pods (potentially unused)
kubectl get namespaces -o json | \\
  jq -r '.items[] | select(.metadata.name | startswith("team-")) | .metadata.name' | \\
  while read ns; do
    pod_count=$(kubectl get pods -n $ns --no-headers 2>/dev/null | wc -l)
    if [ $pod_count -eq 0 ]; then
      echo "Namespace $ns has 0 pods (unused?)"
    fi
  done

# Check last activity (requires annotation tracking)
kubectl get namespace team-old-dev -o jsonpath='{.metadata.annotations.last-activity}'

# Delete if confirmed unused
kubectl delete namespace team-old-dev
How Atmosly Uses Namespaces for Multi-Tenancy (20% Content)
Project-to-Namespace Mapping
Atmosly's organizational structure:
- Organization: Your company (top level)
- Projects: Teams or applications within organization
- Environments: Deployment targets (dev, staging, production)
- Mapping: Each project's environment maps to Kubernetes namespace
Example: Project "Team-A" with 3 environments creates:- team-a-dev namespace (development environment)
- team-a-staging namespace (staging environment)
- team-a-production namespace (production environment)
Automatic Namespace Configuration
When creating project in Atmosly:- Atmosly automatically creates Kubernetes namespaces for project environments
- Applies appropriate labels (team, environment, project-id)
- Configures ResourceQuotas based on project tier (starter, professional, enterprise)
- Sets Pod Security Standard labels (restricted for production, baseline for dev)
- Creates default NetworkPolicies for namespace isolation
- Configures RBAC allowing project members access to their namespaces only
Namespace-Scoped Cost Tracking
Atmosly's cost intelligence uses namespaces for allocation:- Tracks resource usage per namespace (CPU, memory, storage, network)
- Integrates with cloud billing attributing costs to namespaces
- Dashboard shows: team-a-production: $4,200/month, team-a-staging: $800/month
- Enables chargeback or showback per team
- Identifies waste: "team-a-dev has $300/month idle resources (zero traffic weekends)"
Namespace Management Through Platform
Team leads manage their namespaces via Atmosly:- View namespace resource usage and quota consumption
- Request quota increases through UI (approval workflow)
- See which team members have access to which namespaces
- Cannot see or access other teams' namespaces (RBAC enforced)
- Monitor namespace-level events and alerts
(End Atmosly section - ~20% of article)
Best Practices for Namespace Organization
1. Never Use the Default Namespace
The default namespace is a code smell. Always create explicit namespaces.
Why avoid default:- Lacks organization (everything mixed together)
- Cannot apply specific policies (quotas, network policies apply to all default resources)
- Difficult RBAC (granting access to default grants access to everything there)
- Poor practice signaling immature Kubernetes usage
2. Implement Namespace Quotas
Every application namespace should have ResourceQuota. System namespaces (kube-system, monitoring) can be exception.
3. Label Namespaces Consistently
Required labels:- team: Owner team name
- environment: dev, staging, production
- cost-center: For financial tracking
4. Use NetworkPolicies for Isolation
Default deny cross-namespace traffic unless explicitly allowed. Prevents lateral movement if namespace compromised.
5. Enforce Pod Security Standards
# Production namespaces: restricted
kubectl label namespace team-a-production \\
  pod-security.kubernetes.io/enforce=restricted

# Dev namespaces: baseline
kubectl label namespace team-a-dev \\
  pod-security.kubernetes.io/enforce=baseline
6. Document Namespace Purpose
Use annotations:
metadata:
  annotations:
    description: "Team A production workloads serving customer traffic"
    owner: "alice@company.com"
    oncall: "team-a-oncall@company.com"
    budget-monthly: "5000"
    created-by: "platform-team"
    created-date: "2025-01-15"
Common Namespace Anti-Patterns
Anti-Pattern 1: Too Many Namespaces
Creating namespace per microservice:- team-a-user-service-production
- team-a-order-service-production
- team-a-payment-service-production (30+ namespaces for one team!)
Problems: Namespace explosion, complex NetworkPolicies, RBAC nightmare
Better: One namespace per team per environment. Multiple services in same namespace.
Anti-Pattern 2: No Quotas
Namespaces without ResourceQuotas allow unlimited resource consumption. One team can monopolize entire cluster.
Fix: Every namespace gets quota. Start generous, tune based on usage.
Anti-Pattern 3: Cross-Namespace Dependencies Without Policies
Service in namespace-a calls service in namespace-b without NetworkPolicy allowing it.
Works by default (flat network) but creates security risk. Should be explicitly allowed via NetworkPolicy.
Advanced Namespace Features
Namespace-Scoped Resources
Some resources can be scoped to namespace affecting all pods within:
# LimitRange applies defaults to all pods in namespace
apiVersion: v1
kind: LimitRange
metadata:
  name: default-limits
  namespace: team-a-production
spec:
  limits:
  - type: Container
    default:
      cpu: 500m
      memory: 512Mi
    defaultRequest:
      cpu: 250m
      memory: 256Mi

# All pods without resource specs get these defaults automatically
Namespace Deletion Protection
Prevent accidental deletion of critical namespaces:
metadata:
  annotations:
    \"\"namespace.kubernetes.io/finalizer\"\": \"\"prevent-deletion\"\"

# Or use admission webhook blocking deletion of production namespaces
Conclusion: Namespace Management for Scalable Kubernetes
Effective namespace management is foundational for operating Kubernetes at scale with multiple teams and applications. Implement consistent naming conventions, appropriate organizational patterns (per team per environment recommended), ResourceQuotas preventing monopolization, NetworkPolicies for isolation, Pod Security Standards per namespace, and comprehensive labeling for automation and cost allocation.
Namespace Management Checklist:
- Never use default namespace for applications
- Consistent naming convention (team-environment pattern)
- Labels on all namespaces (team, environment, cost-center)
- ResourceQuota on every application namespace
- LimitRange for default container resources
- NetworkPolicies blocking cross-namespace by default
- Pod Security Standard labels per environment type
- Documentation in annotations (owner, purpose)
- Automated creation and cleanup processes
- Cost tracking and allocation per namespace
- Use Atmosly for project-based namespace management with automatic configuration
Ready to implement scalable namespace management? Use Atmosly for automatic namespace creation per project, quota enforcement, cost tracking per namespace, and RBAC-controlled access, ensuring teams manage only their namespaces