Introduction
Managing traffic routing in Kubernetes can be challenging, especially with multiple methods available-NodePort, LoadBalancer, and Ingress. Each method has distinct use cases, benefits, and limitations, making it essential to choose the right one for your specific needs.
In this blog, we’ll break down the key differences between NodePort, LoadBalancer, and Ingress, helping you understand when to use each service type, their pros and cons, and how to optimize Kubernetes networking for production. By the end, you’ll know exactly which Kubernetes service type best suits your deployment strategy.
ClusterIP : The Basics
The most basic type of service you can create in Kubernetes is the ClusterIP. This service type allows communication only between services within the same cluster. It's crucial to note that you cannot use ClusterIP to expose your services to the outside world. However, there are some scenarios where this service type is useful.
For instance, it's often used for internal services like the Kubernetes dashboard. To access it from your laptop, you can use the kubectl proxy command and navigate to localhost in your web browser. This method is primarily for debugging and should not be used for production services.
Example ClusterIP Service YAML
apiVersion: v1
kind: Service
metadata:
  name: my-clusterip-service
spec:
  selector:
    app: my-app
  ports:
    - protocol: TCP
      port: 80        # The port that the service will listen on
      targetPort: 8080 # The port that the container is exposing
How It Works
- Selector: The service uses the selector to find the Pods with the app: my-app label.
- Port Mapping: It maps port 80 on the service to port 8080 on the selected Pods.
- Internal IP: Kubernetes assigns a ClusterIP to this service, which can be used by other services within the cluster to access it.
Accessing a ClusterIP Service
Since the service is internal-only, you can access it from within the cluster using:
kubectl exec -it <pod-name> -- curl http://my-clusterip-service:80NodePort: A Basic Method to Expose Services
Next on our list is NodePort, which is the most primitive way to export services to the internet. With NodePort, Kubernetes nodes are given public IP addresses, and you can create firewall rules to let incoming traffic through. Here's how it works: you open a port on the Kubernetes node, which can be a virtual machine, and any traffic sent to that port is routed to the service you want to expose.
For example, when defining a NodePort service, you specify a port number (within the range of 30000 to 32767), and requests to any Kubernetes node will be forwarded to the application, even if it's located on a different node. However, using NodePort does come with its own set of challenges:
- Security risks arise from assigning public IP addresses to nodes.
- Each service can only be exposed on a single port.
- If a Kubernetes node's IP changes, you may need to update your DNS records.
Example: NodePort Service YAML
apiVersion: v1
kind: Service
metadata:
  name: my-nodeport-service
spec:
  type: NodePort
  selector:
    app: my-app
  ports:
    - protocol: TCP
      port: 80            # Port on the service
      targetPort: 8080     # Port on the Pod
      nodePort: 30001      # The port on the node
How It Works
- Selector: The service selects Pods with the label app: my-app.
- Port Mapping:
- Port 80 is the service port that internal cluster services will use.
- targetPort 8080 is where the service forwards the traffic to the Pod.
- nodePort 30001 is the port opened on all nodes in the cluster.
Accessing the Service: You can access the service externally using
<NodeIP>:30001. For example:
curl http://<node-ip>:30001While NodePort can be handy for short-term use, such as during a demo for a potential client, it’s generally not recommended for production environments due to these limitations.
LoadBalancer: A Standard Approach for Production
The LoadBalancer service type is a more standard way to expose services to the internet. When you declare a service of this type, the cloud controller manager automatically provisions a load balancer based on the cloud provider where your Kubernetes cluster is deployed. This approach allows you to expose services directly and is often the preferred choice for production environments.
LoadBalancer services can handle various types of traffic, including HTTP, TCP, UDP, and WebSockets. However, there are some caveats:
- You need to create a LoadBalancer service for each application you want to expose, which can become costly.
- It does not provide advanced features like filtering or routing.
- Using LoadBalancer can lead to a proliferation of load balancers if you have many services, increasing costs.
Example: LoadBalancer Service YAML
How It Works
- Selector: The service selects Pods with the label app: my-app.
- Port Mapping:
- Port 80 is exposed to the outside world.
- targetPort 8080 is the port on the Pod that handles the request.
- Automatic Load Balancer Provisioning:
- The cloud provider (e.g., AWS, GCP, Azure) automatically creates a load balancer.
- The service is assigned an external IP address that routes traffic to the appropriate Pods.
Accessing the LoadBalancer Service
Once the service is created, you can get the external IP address using:
kubectl get services my-loadbalancer-serviceThe output will show an external IP:
NAME                     TYPE           CLUSTER-IP      EXTERNAL-IP     PORT(S)        AGE
my-loadbalancer-service  LoadBalancer   10.96.95.149    34.123.45.67    80:32421/TCP   5m
You can then access your service at:
http://34.123.45.67Despite these limitations, LoadBalancer is often the go-to option for exposing services because it simplifies external access and provides a stable endpoint for clients.
Ingress: The Smart Router
Finally, we have Ingress, which is not a service type but a powerful API object that manages external access to services in a Kubernetes cluster. Ingress acts as a smart router or entry point, allowing you to route traffic to multiple services based on defined rules. This capability makes Ingress a versatile choice for more complex applications.
Ingress supports both path-based and subdomain-based routing. For example, you can route requests from api.example.com to an API service and example.com/full to another service. Ingress controllers, such as NGINX or Traefik, handle the incoming traffic and direct it to the appropriate backend service.
Some advantages of using Ingress include:
- Cost efficiency: You only need to maintain a single load balancer, which reduces costs compared to having multiple LoadBalancer services.
- Advanced features: Ingress can handle SSL termination, HTTP routing, and more, which are not available with NodePort or LoadBalancer services.
- Flexibility: You can easily add or modify routing rules as your application evolves.
Example: Ingress Resource YAML
Here's an example configuration demonstrating how to set up Ingress to route traffic to different services:
apiVersion: networking.k8s.io/v1
kind: Ingress
metadata:
  name: my-ingress
  annotations:
    nginx.ingress.kubernetes.io/rewrite-target: /
spec:
  rules:
  - host: example.com
    http:
      paths:
      - path: /api
        pathType: Prefix
        backend:
          service:
            name: api-service
            port:
              number: 80
      - path: /app
        pathType: Prefix
        backend:
          service:
            name: app-service
            port:
              number: 80
How This Configuration Works
- Host-Based Routing: Requests to example.com are routed through this Ingress.
- Path-Based Routing:
- Requests to example.com/api are forwarded to the api-service.
- Requests to example.com/app are forwarded to the app-service.
- Annotations: The rewrite-target annotation is specific to the NGINX Ingress controller, allowing the paths to be rewritten as needed.
Deploying the Ingress
- Create the Services that will be routed to by the Ingress:
apiVersion: v1
kind: Service
metadata:
  name: api-service
spec:
  selector:
    app: api-app
  ports:
    - protocol: TCP
      port: 80
      targetPort: 8080
---
apiVersion: v1
kind: Service
metadata:
  name: app-service
spec:
  selector:
    app: app-app
  ports:
    - protocol: TCP
      port: 80
      targetPort: 8080
- Apply the Ingress Resource:
kubectl apply -f ingress.yaml
- Verify the Ingress Status:
kubectl get ingress
However, Ingress can also be complex to set up and manage, especially if you're using multiple Ingress controllers or have intricate routing requirements.
.png)
Choosing between NodePort, LoadBalancer, and Ingress depends on your specific needs:
- Use ClusterIP for internal-only services.
- Use NodePort for quick external access (but NOT for production).
- Use LoadBalancer for public-facing apps that need stable external IPs.
- Use Ingress for cost-effective, advanced routing of multiple services.
How Atmosly Simplifies Connectivity with Cluster IP & Load Balancer + Ingress
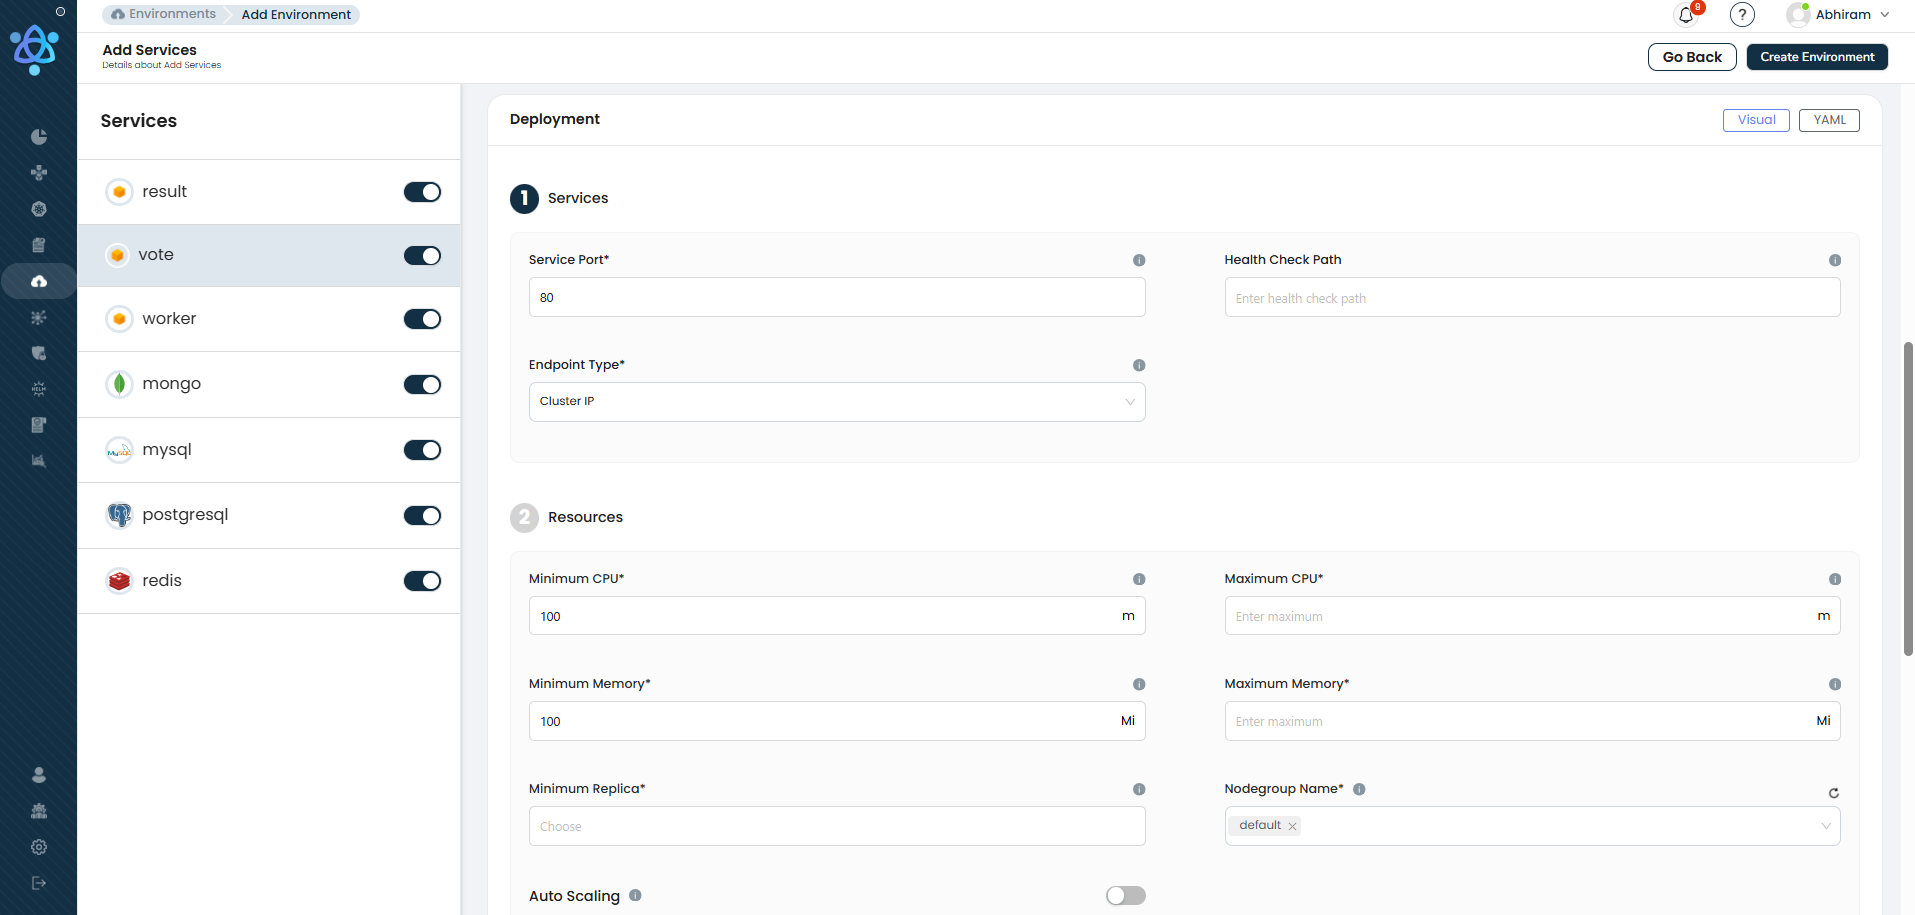
After exploring the different service types in Kubernetes—ClusterIP, NodePort, LoadBalancer, and Ingress—let's look at how Atmosly makes managing connectivity effortless. Atmosly provides an intuitive interface that allows you to select the right service type without diving into complex Kubernetes YAML files or manual configurations.
1. Internal Services with Cluster IP: The Simple Way
For services that only need internal access within the Kubernetes cluster, Atmosly offers a streamlined Cluster IP configuration:
- One-Click Setup: Simply select Cluster IP as the endpoint type. Atmosly automatically configures the service to be accessible only within the cluster.
- Automatic Service Discovery: Other internal services can access this service seamlessly using the Kubernetes DNS or service name.
- Enhanced Security: Since there is no external exposure, these services remain secure and protected from outside threats.
Example: When setting up an internal service like a database or a backend API, selecting Cluster IP ensures the service remains private while still being fully functional for internal use.

2. External Services with Load Balancer + Ingress: No YAML Required
For services that need to be accessible from outside the cluster, Atmosly provides a simple option to configure a Public Load Balancer along with Ingress:
- Effortless Setup: Simply select Public Load Balancer and set the Service Type to Existing Load Balancer (NGINX Ingress)—no YAML needed.
- Advanced Traffic Management: Seamlessly configure path-based routing (e.g.,
/graphql,/rest) and domain-based routing (e.g.,backend2.yourdomain.com) directly in the UI. - Built-in Security: Automatically handle SSL termination and HTTPS traffic, eliminating manual setup.
This streamlined approach ensures efficient, secure, and flexible traffic routing without the usual complexity.
How It Works Behind the Scenes:
- Automatic Load Balancer Provisioning – Assigns an external IP to manage incoming traffic seamlessly.
- Ingress Controller for Smart Routing – Directs traffic based on predefined rules for reliable service access.
- No Manual Configuration Required – Eliminates the need for complex Ingress setup.
Flexibility & Ease of Use: Simplifying Service Exposure
The intuitive UI makes it easy to choose whether a service should be internal or external:
- Cluster IP for Internal Use – If external access isn’t needed, simply select Cluster IP and deploy.
- Public Load Balancer for External Access – For publicly accessible services, select Public Load Balancer, add a DNS record, and the platform handles the rest.
- Built-in Health Checks – Define health check paths to monitor services and ensure uptime
No More Manual Configurations: Atmosly removes the need to create custom Kubernetes YAML files, set up Ingress Controllers, or manage LoadBalancer resources manually.
Conclusion
Understanding the differences between NodePort, LoadBalancer, and Ingress is crucial for managing traffic to your Kubernetes services. Each method serves specific needs, from simple internal communication to advanced external routing.
Atmosly simplifies this process by providing an intuitive interface to configure Cluster IP for internal services and Public Load Balancer + Ingress for external access. With Atmosly, you avoid complex configurations and streamline service management, allowing you to focus on building and scaling your applications.
Try Atmosly — no YAML required
Skip manual Ingress + LB configs: enable Public Load Balancer + Ingress from Atmosly UI and get TLS, routing, and health checks configured automatically. Try Atmosly Free


